We obtained a copy of their floor plan book and, selecting the features we liked best form all the floor plans we had already perused, found the base for the home we wanted. In April of 2005 we attended a seminar at Beaver Mountain on the process of purchasing, financing and constructing a log home. We also toured their milling plant in Deposit, New York. At that time we arranged to come back in a couple of weeks to sit down with Joan and a computer draftsman to draw up the preliminary plans of our new home.
When we returned to Beaver Mountain with our ideas we spent three hours with Joan and CAD wizard John tweaking the drawings to get what we desired. Both of these experienced people added to our ideas while pointing out options/errors of which we were unaware. We started with Beaver Mountain’s standard floor plan called the Killington. They call it a chalet style home, but we made some sizable alterations.
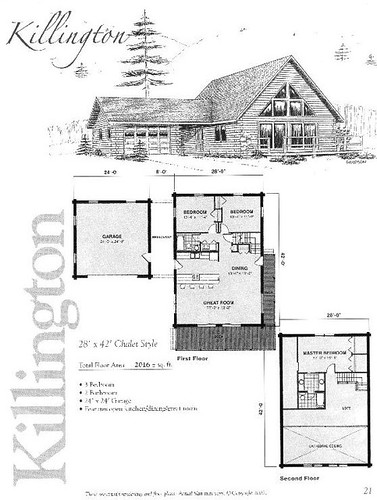
The Killington Model
First we added two feet on the gable end of the bedrooms making the footprint 28’ x 44’ and giving us first floor bedrooms of 13’-4” x 13’-4” each and a master bedroom on the second floor that was 17’-0” x 13’-4”.
Next, we flipped the interior of the house proper so it was a mirror image of the original and added a dormer that ran the length of the master bath and bedroom on the second floor. This added to the headroom and usable floor space in the master bedroom, allowed the bath to me moved to the exterior wall directly above the first floor bath and expanded the usable loft area.
We placed a zero-clearance fireplace in the corner of the great room and plan to encase the chimney with “cultured” river-run stone. This material is only 1/2-3/4 inch thick and is installed like tile. It is much lighter than a conventional brick chimney so it requires less support.
We widened the breezeway two feet and enclosed it to make it into an entrance foyer and laundry room.
On the side of the house away form the garage, which now held the kitchen, we added a covered porch that ran from the front right corner halfway down the house. Being accessible to the kitchen, this will make a nice area to sit and have dinner while the sun is setting in the distance.
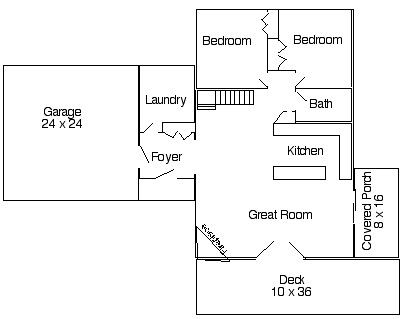
First Floor Layout
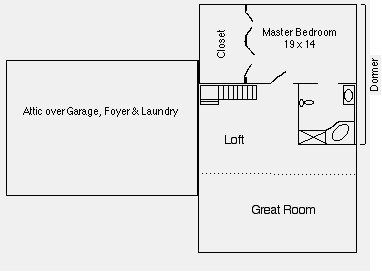
Second Floor Layout-The Master Suite and Loft
We changed the trusses over the garage to attic trusses (as opposed to the W-shapes of standard trusses, these are H-shaped and provide for storage area with decent headroom down the middle of the attic).
We decided to go with a curved window motif for the gable ends instead of the very triangular design on the model. I thought it gave the home a more Mission or Arts & Crafts style rather than a contemporary look. Since we are talking of decorating in that way and our casement windows and entrance door will be Mission Style I figured that was the way to go.
Because of the slope of our property, the basement (there will be a full basement under everything but the garage) will have a walk out on the gable end beneath the great room/living room. This basement will have a place for all the utilities (under the foyer and laundry), a sizable woodworking shop (under the two first floor bedrooms) and a bathroom (under the first floor bath). The remainder of the basement (under the great room, kitchen and dining room) will be a second family/game room with its own wood-burning stove (directly beneath the first floor fireplace so the chimney can use the same chase).
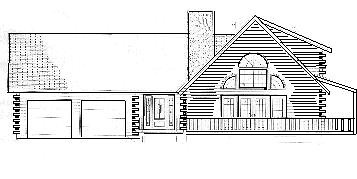
Front Elevation of the Aerie
The bench on which the house will be built is at an elevation of 2100 feet, hence the name The Aerie. The deck and glass gable end will face the north overlooking the valley through which Route 6 runs and we will have a 210 degree view from the east to the west with the hills of New York State in the distance.
As I have already mentioned we have selected a general contractor, Don K., and made a deposit on our kit. There are a few details to be worked out and financing yet to be obtained, but ground breaking and construction is scheduled for the spring of 2006. (If we can get the excavator to do some work this fall—widening the drive, digging for the foundation, etc.—so much the better.) We are hoping to be able to move in by the end of 2006.
5 comments:
VERY VERY NICE!!!
Delirium what that
How'd the house turn out? I am looking to build something similar.
Anything you wished you would have done differently? I am planning on putting the kid rooms in the loft area and master on main floor.
Gina, this rather long blog shows all the work we did in 2006 constructing the Aerie.
http://joated-loghome.blogspot.com/
Our master is upstairs with two bedrooms on the first floor. (One could become a master if we couldn't navigate the stairs!)
Only problem we have is the lack of light and electrical outlets in the main living area. There's a few places we need a couple more switches and an outlet or two.
(Being on the south side of the hill would have been nice too, but you can't always get what you want.)
Oh, I should have mentioned, the second floor is solid pine. It's 1-01/2 inches thick but it really doesn't stop any sounds from below. If I had kids, I'd want a more sound containing/barrier system.
Post a Comment